

Preface ⚡
Join me in my Google Summer of Code 2023 journey with TensorFlow as I’ll be sharing insights on the GestureRecognizer API from the Task-Vision library for the web.
Additionally, explore how to create a custom Gesture Recognizer using MediaPipe’s Model Maker. Get ready for an exciting series of blog posts packed with experiments and valuable learnings.

🔺 A few important links to get you started:
For more information about the project, please visit here: Interactive Web Demos using the MediaPipe Machine Learning Library.
Explore my Community Bonding experience here: Community Bonding Period Experience.
Know more about MediaPipe here: A Holistic Preview of MediaPipe.
Motivation 🤩
The COVID-19 pandemic has brought a drastic change to our lives, as people are now more aware of the risks associated with touch and hygiene. Reports indicate that 80% of people find public touchscreens unhygienic. Despite the end of the pandemic, touchless systems are expected to remain popular due to their intuitive and futuristic appeal.
Touchless gesture-based intuitive systems can reduce transmission in public settings and workplaces, and offer a seamless and convenient experience. Touchless technology will likely become more widespread in various industries, such as ATMs, airports, hotels, retail, healthcare and hospitality as well as in gaming industry, as organizations recognize the value of meeting customer expectations and improving efficiency by offering a cutting-edge experience. The plan is to develop an interactive web app which works with simple human gestures to facilitate perfect contactless interactions with interfaces.
Initially the proposed application was bound to incorporate four key MediaPipe components, including:
- @mediapipe/camera_utils — Utilities to operate the camera.
- @mediapipe/control_utils — Utilities to show sliders and FPS widgets.
- @mediapipe/drawing_utils — Utilities to draw landmarks and connectors.
- @mediapipe/hands — Utilities to detect & track hands + fingers.
Now, things have become much easier. We will utilize MediaPipe’s newly released Task Vision API, specifically the HandGestureRecognizer Task for the web, which is built upon MediaPipe’s Solutions API. This will greatly simplify the process.
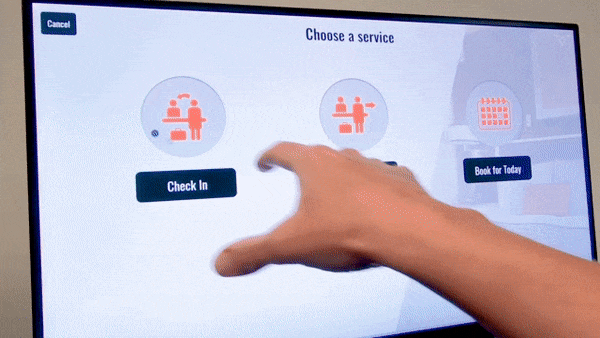
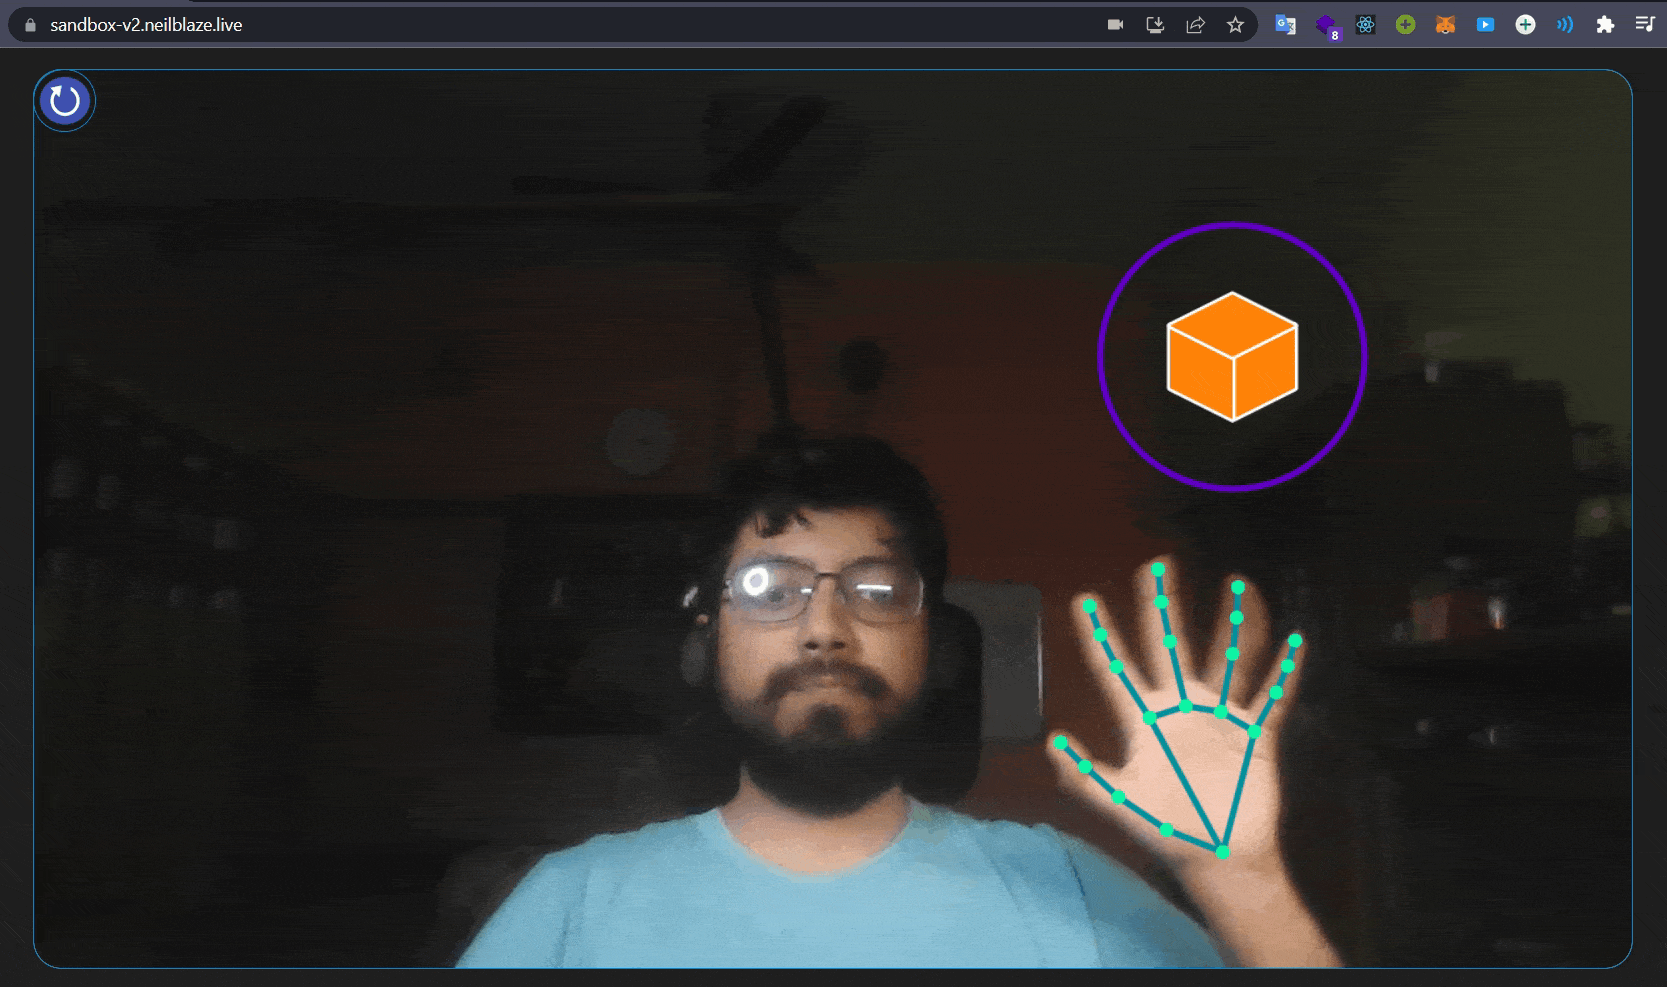
🛈 The ultimate goal is to provide a web app that showcases an augmented transaction panel previewed on screen, enabling users to interact accurately through intuitive gestures detected from an input video feed. Users can perform essential Create, Read, Update, and Delete (CRUD) operations of items directly through the interactive floating panel (on screen) via custom simple-to-use gestures, enabling them to experience the checkout process without the need for physical touch.
While it is possible to utilize the pre-trained gestures available in Mediapipe’s tasks-vision API, specifically the “mp.tasks.vision.GestureRecognizer”, we will take a different approach. We will leverage MediaPipe’s Model Maker to create our own Gesture Recognizer task. This custom task will enable us to classify gestures and trigger events accordingly. Once the task is developed, we will deploy it on a free serverless PaaS like Vercel.

Background Study & Market Research 🔬
The driving force behind conducting background research and market analysis for this project is to understand the feasibility and practicality of the proposed idea in the current market. Through extensive research spanning several weeks, the project’s unique selling proposition is its ease of implementation, low maintenance, high accuracy, and efficiency. Although there are existing commercial solutions such as Ultraleap & Ideum, the project’s ultimate objective is to make this technology accessible to the masses, as it will be open-sourced. The open-source nature of the project empowers developers to customize and integrate their own features, enhancing its flexibility and utility. Not to mention, all of the computation is performed on the client side itself making it way more secure than anything else! With that said, performing machine learning on-device can help to improve Latency, Power consumption, Connectivity, and most importantly Privacy.
Pre-GSOC Work:
I’m been consistently exploring the API docs & working on this project for a while, & have successfully implemented the MediaPipe HandTrack in this example app.
You can access the GitHub repository 🔗here & the live demo 🔗here.
Brief intro to TensorFlow & MediaPipe
In general, TensorFlow is an open-source machine learning framework developed by Google that has gained widespread adoption and is used by researchers, developers, and practitioners around the world. MediaPipe, on the other hand, is an open-source framework built on TensorFlow that enables the development of cross-platform pipelines for various media processing applications.
So why MediaPipe ? 🤔
MediaPipe, within the TensorFlow ecosystem, focuses specifically on media processing tasks such as video analysis, gesture recognition, and augmented reality. It provides a comprehensive set of tools and libraries that make it easier to build real-time applications for a wide range of platforms, including mobile devices, desktops, and the Web.
💡 Perceiving hand shape and motion is crucial for enhancing user experience in various domains and platforms. It enables hand gesture control and overlaying digital content on the physical world in augmented reality. However, real-time hand perception is a challenging computer vision task due to occlusions and lack of high contrast patterns.
🚀 Google’s MediaPipe Hands Solution is a high-fidelity hand and finger tracking solution from real-time video input. It performs exceptionally well in various backgrounds with multiple objects, as it employs machine learning (ML) to infer 21 3D landmarks of a hand from just a single frame via regression, that is direct coordinate prediction. The model learns a consistent internal hand pose representation and is robust even to partially visible hands and self-occlusions. This is essential for hand & finger tracking for gesture-based interfaces or augmented reality experiences. The library is designed to be easy to use and provides a high-level API for integrating hand tracking into this application.
And above all, it’s free & open-source! 🧡
🛈 You can access the official model card for MediaPipe Hands (Lite/Full) 🔗here. It provides detailed information about the model. You can also refer to the official research paper on the same, available 🔗here.
MediaPipe Tasks got introduced in Google I/O 2023 & provides no-code to low-code solutions to common on-device machine learning tasks (such image classification, segmentation, & others, for different platforms including Web). To learn more, feel free to refer to I/O 2023 sessions: Easy on-device ML with MediaPipe, Supercharge your web app with machine learning and MediaPipe, and What’s new in machine learning, and check out their official documentation over 🔗here.
Not to mention, MediaPipe has simplified the development of customizable, production-ready, and cross-platform on-device machine learning solutions. Here are the key features:
- Lightweight ML models with high accuracy
- Domain-specific processing for vision, text, and audio
- Efficient acceleration on both CPU and GPU
- Support for complex pipeline graphs with multiple models and states
- Cross-platform deployment on Android, iOS, web, and bare metal
Now, let’s focus on the project. With MediaPipe Tasks (a low-code API), you can easily deploy advanced on-device ML solutions. Choose a task, such as hand gesture recognition, that suits your needs. With just a few lines of code, you can deploy your solution across multiple platforms. It’s that simple!
Why use gesture recognition? ✌️🤟👌
The goal of improving human-computer interaction has been pursued since the early days of the computer revolution. Touch screens have made interactions more natural, and gesture recognition technology is expected to further enhance this experience. Gestures are natural and expressive body motions that convey information or interact with the environment. It provides an intuitive way for humans to interact with devices without physical contact*. It can be used in a variety of applications, including Gaming 🎮, AR/VR 🥽, and holds great potential for the future.

The advantages of touchless gesture control include:
- Easy to operate & provides a new way of interaction.
- Intuitive and user-friendly controls.
- Works with most devices having a camera.
- Low power consumption & maintenance cost.
Our project introduces a novel approach using MediaPipe ML library for fast and reliable gesture recognition. It allows for the quick addition or modification of gestures, making the system flexible and adaptable to changes. Our software understands the hand’s skeletal structure, its spatial relationship to objects, and dynamic gestures like clicking, grabbing, and releasing in real-time.
What is MediaPipe Solutions ?
MediaPipe Solutions is a versatile framework based on MediaPipe for creating machine learning pipelines across platforms. It offers customizable building blocks for applying AI and ML techniques to your specific requirements. With MediaPipe Solutions, you can quickly integrate and customize these solutions in your applications, supporting multiple development platforms. It is available for Web (JavaScript), Python, and Android (Java), and is part of the open-source MediaPipe project, allowing further customization as needed.
🔆 These libraries and resources provide the core functionality for each MediaPipe Solution:
- MediaPipe Tasks: Cross-platform APIs and libraries for deploying solutions. Learn more.
- MediaPipe Models: Pre-trained, ready-to-run models for use with each solution.
🔆 These tools let you customize and evaluate solutions:
- MediaPipe Model Maker: Customize models for solutions with your data. Learn more.
- MediaPipe Studio: Visualize, evaluate, and benchmark solutions in your browser. Learn more.
For our project, we will utilize Hand Landmark Detection and Gesture Recognition. Furthermore, we will customize the Gesture Recognition Model using MediaPipe Model Maker and incorporate the task-vision package from MediaPipe.
○ Notable Tasks-Vision package Classes:
| Class | Description |
| DrawingUtils | Helper class to visualize the result of a MediaPipe Vision task. |
| FilesetResolver | Resolves the files required for the MediaPipe Task APIs. |
| GestureRecognizer | Performs hand gesture recognition on images. |
| HandLandmarker | Performs hand landmarks detection on images. |
○ Notable Tasks-Vision package Interfaces:
| Interfaces | Description |
| BoundingBox | An integer bounding box, axis aligned. |
| Category | A classification category. |
| Classifications | Classification results for a given classifier head. |
| Detection | Represents one detection by a detection task. |
| DetectionResult | Detection results of a model. |
| DrawingOptions | Options for customizing the drawing routines. |
| Embedding | List of embeddings with an optional timestamp. |
| GestureRecognizerOptions | Options to configure the MediaPipe Gesture Recognizer Task. |
| GestureRecognizerResult | Represents the gesture recognition results generated by GestureRecognizer. |
| HandLandmarkerOptions | Options to configure the MediaPipe HandLandmarker Task. |
| HandLandmarkerResult | Represents the hand landmarks detection results generated by HandLandmarker. |
| Landmark | Landmark represents a point in 3D space with x, y, z coordinates. |
| LandmarkData | Data that a user can use to specialize drawing options. |
| NormalizedLandmark | Represents a point in 3D space with x, y, z coordinates. |
| RegionOfInterest | A Region-Of-Interest (ROI) to represent a region within an image. |
○ Notable Tasks-Vision package Type Aliases:
| Type Aliases | Description |
| Callback | A user-defined callback to take input data and map it to a custom output value. |
| ImageSource | Valid types of image sources which we can run our GraphRunner over. |
| PoseLandmarkerCallback | A callback that receives the result from the pose detector. |
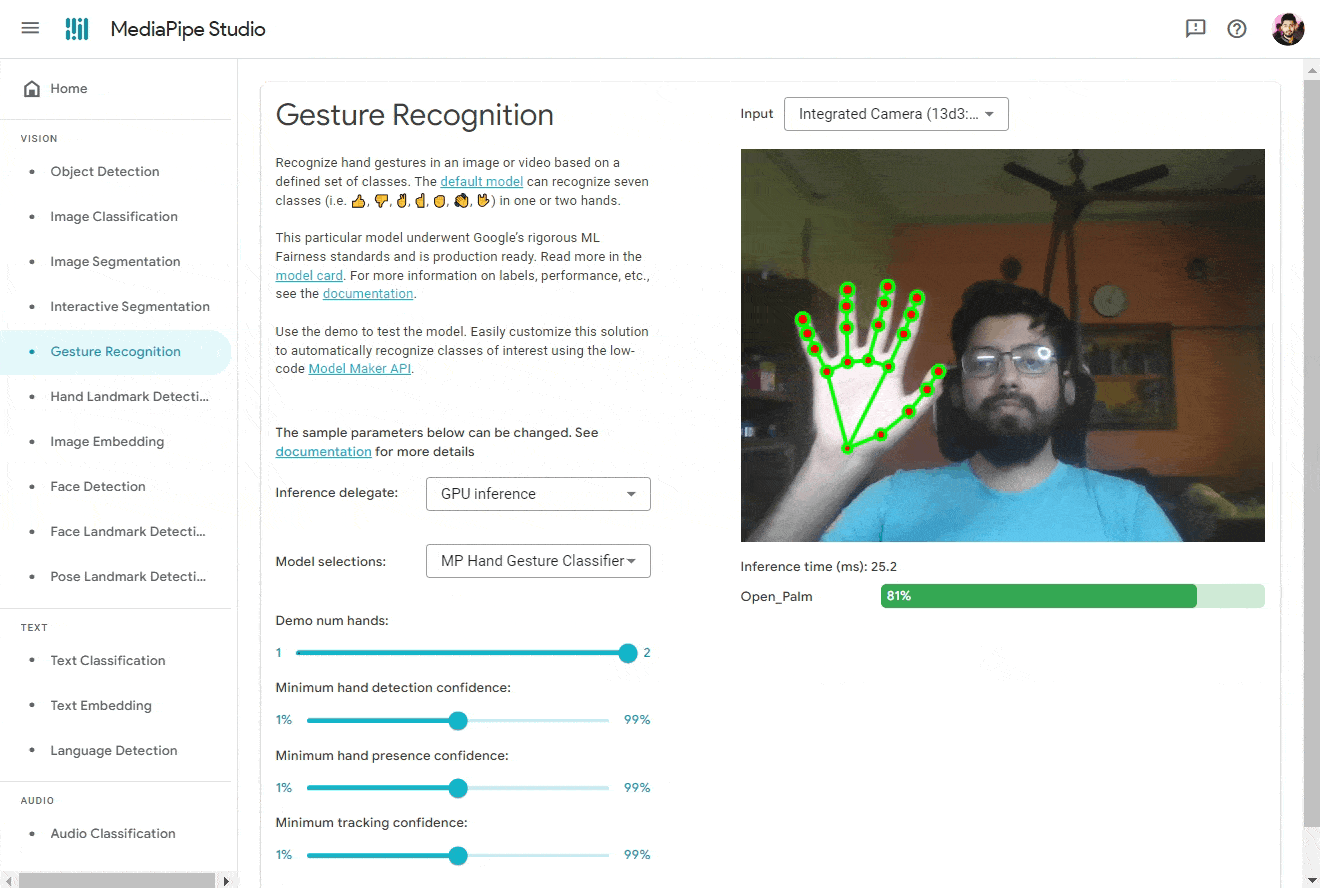
🧵 MediaPipe’s Tasks Vision API lets you apply machine-learning (ML) solutions to your apps. It provides a framework that lets you configure & customize prebuilt processing pipelines and update default models with Model Maker. Once done, test your customized solution using the MediaPipe Studio Gesture Recognition demo available 🔗here.
The demo recognizes hand gestures based on predefined classes, with the default model recognizing seven classes (👍, 👎, ✌️, ☝️, ✊, 👋, 🤟) in one or two hands. The default model has undergone Google’s rigorous ML Fairness standards and is production ready. Refer to the model card for more details. Check the documentation for label information and performance.
ⓘ The Gesture Recognizer consists of a hand landmark model bundle and a gesture classification model bundle. The landmark model detects hands and hand geometry, while the gesture recognition model identifies gestures based on hand geometry. The present
HandGestureClassifiertask supports modifying the model bundle using Model Maker.
Although the default gesture recognizer model can be used, the final project requires a specific gesture (”👌”) for “click” operation, which is not included in the base classifier model. To address this, we need to train our own gesture recognizer using MediaPipe Model Maker. Follow the tutorial below for more information.

🏗️ TUTORIAL: Create a custom Gesture Recognizer model using MediaPipe Model Maker
Before we start 🛑
MediaPipe Solutions lets you apply machine-learning (ML) solutions to your apps. It provides a framework that lets you configure prebuilt processing pipelines that deliver immediate, engaging, and useful output to users. You can even customize these solutions with Model Maker to update the default models.
What you’ll build 🧶
In this tutorial, we will customize a gesture recognizer model using the MediaPipe Model Maker for recognizing some common hand gestures using a hand crafted dataset (from scratch). Once we are done with the training, we will test the model using the MediaPipe Studio Gesture Recognition demo which can be found 🔗here.
Pre-requisites 📝
- A computer with a camera (webcam or USB camera)
- A device with a web browser & internet connection
- A Google account (for accessing Google Colab & Google Drive)
- Basic knowledge of Python (v3.7+)
0️⃣1️⃣ Setup 💻
You can follow the default guide. To simplify the process, open this → 🔗 Google Colab notebook in your browser and create a copy of it. Ensure that you are logged in with your Google account and have access to Google Drive.
If you want, you can also save a copy to GitHub or download the notebook and run it locally on your computer.
- Start by installing the required packages & importing the required libraries.
1!pip install --upgrade pip2!pip install mediapipe-model-maker
1from google.colab import files2import os3import tensorflow as tf4assert tf.__version__.startswith('2')56from mediapipe_model_maker import gesture_recognizer78import matplotlib.pyplot as plt
0️⃣2️⃣ Collecting data 💿
Here, instead of using the default rock-paper-scissors (rps) dataset, we will be creating our own dataset. The dataset will contain images of (a few of) our hand gestures. It’s a time consuming process, but to simplify it, I used Teachable Machine to collect my own image samples for the dataset. You can also use the same or any other tool of your choice.
- Open Teachable Machine & create a new project.
- Add your own custom classes (i.e. grab ✊, success 🤟, click 👌, etc.) & start collecting data. It’s to be noted that there is no such upper cap for the count of classes, but for this tutorial, we will be using only a few common classes.
- Once you’re done collecting the data, export each image-sample of respective classes as a
.zipfile.
Create a parent-folder, and inside it create respective sub-folders for each classes (i.e. ✊, 🤟, 👌 & none) and extract the
.zipfiles in their respective folders.Take some time to go through the dataset and remove any unwanted images (if any), & in the “none” folder, add some images of your hand without any gesture or neutral gesture. This will help the model to learn the difference between the gestures & the neutral gesture.
Once you’re done with the dataset, create a
.zip& upload it to your Google Drive. I’ve already uploaded the dataset to my Google Drive & you can download it from → 🔗here.
0️⃣3️⃣ Import the dataset from Google Drive / CDN ☁️
For this tutorial, we will use our own Dataset, which can be fetched from either Google Drive or a CDN (Content Delivery Network) link. To connect and mount Google Drive, execute the provided code and follow the instructions.
1from google.colab import drive2drive.mount('/content/gdrive')
- After executing the above cell, you will be prompted to authorize your Google Drive account. Once you successfully connect your Google Drive account, you will see something like this 👇
- Next, we need to
unzipthe dataset. In this tutorial, we have used our custom dataset named “alpha_data_sample.zip”, which is located inside thegsoc_custom_datafolder on our Google Drive.
Now, open the Google Colab notebook and paste the path of the .zip file in the !unzip command (Don’t forget to replace <PATH> with your drive’s file_path). Execute the cell, and you will find the dataset displayed in the left sidebar of the notebook.
1!unzip gdrive/My\ Drive/<PATH>/alpha_data_sample.zip2dataset_path = "alpha_data_sample"
0️⃣4️⃣ Verify the dataset ✅
Verify the (custom) dataset by printing the labels. For our custom dataset, there should be 8 gesture labels, with one of them being the none gesture.
1print(dataset_path)2labels = []3for i in os.listdir(dataset_path):4 if os.path.isdir(os.path.join(dataset_path, i)):5 labels.append(i)6print(labels)
You should receive an output similar to this 👇
1alpha_data_sample2['ok', 'pointUp', 'hovering', 'erase', 'click', 'confirm', 'grab', 'none']
0️⃣5️⃣ Visualizing the dataset 🖼️
To better understand the dataset, plot a couple of example images for each gesture.
1NUM_EXAMPLES = 4 # Customizable per need23for label in labels:4 label_dir = os.path.join(dataset_path, label)5 example_filenames = os.listdir(label_dir)[:NUM_EXAMPLES]6 fig, axs = plt.subplots(1, NUM_EXAMPLES, figsize=(10,2))7 for i in range(NUM_EXAMPLES):8 axs[i].imshow(plt.imread(os.path.join(label_dir, example_filenames[i])))9 axs[i].get_xaxis().set_visible(False)10 axs[i].get_yaxis().set_visible(False)11 fig.suptitle(f'Showing {NUM_EXAMPLES} examples for {label}')1213plt.show()
You should receive an output similar to this 👇

💡 The provided samples were captured under low-light conditions, primarily for stress-testing purposes. When recording your own samples, it is advisable to ensure adequate lighting conditions for improved accuracy.
0️⃣6️⃣ Run the example 🚴
The workflow consists of 4 steps which have been separated into their own code blocks.
Load the dataset ⏳
Load the dataset located at dataset_path by using the Dataset.from_folder method. When loading the dataset, run the pre-packaged hand detection model from MediaPipe Hands to detect the hand landmarks from the images. Any images without detected hands are ommitted from the dataset. The resulting dataset will contain the extracted hand landmark positions from each image, rather than images themselves.
The HandDataPreprocessingParams class contains two configurable options for the data loading process:
shuffle: A boolean controlling whether to shuffle the dataset. Defaults to true.min_detection_confidence: A float between 0 and 1 controlling the confidence threshold for hand detection.
Split the dataset: 80% for training, 10% for validation, and 10% for testing.
1data = gesture_recognizer.Dataset.from_folder(2 dirname=dataset_path,3 hparams=gesture_recognizer.HandDataPreprocessingParams()4)5train_data, rest_data = data.split(0.8)6validation_data, test_data = rest_data.split(0.5)
0️⃣7️⃣ Train the model 🏋️
Train the custom gesture recognizer by using the create method and passing in the training data, validation data, model options, and hyperparameters. For more information on model options and hyperparameters, see the Hyperparameters section below.
1hparams = gesture_recognizer.HParams(export_dir="exported_model")2options = gesture_recognizer.GestureRecognizerOptions(hparams=hparams)3model = gesture_recognizer.GestureRecognizer.create(4 train_data=train_data,5 validation_data=validation_data,6 options=options7)
You should see an output similar to this 👇
1Model: "model_5"2_________________________________________________________________3 Layer (type) Output Shape Param #4=================================================================5 hand_embedding (InputLayer) [(None, 128)] 067 batch_normalization_5 (Batc (None, 128) 5128 hNormalization)910 re_lu_5 (ReLU) (None, 128) 01112 dropout_5 (Dropout) (None, 128) 01314 custom_gesture_recognizer_o (None, 8) 103215 ut (Dense)1617=================================================================18Total params: 1,54419Trainable params: 1,28820Non-trainable params: 25621_________________________________________________________________22None23Resuming from exported_model/epoch_models/model-001024Epoch 1/1025767/767 [==============================] - 7s 8ms/step - loss: 0.2332 - categorical_accuracy: 0.7647 - val_loss: 0.2945 - val_categorical_accuracy: 0.8333 - lr: 0.001026Epoch 2/1027767/767 [==============================] - 4s 5ms/step - loss: 0.2294 - categorical_accuracy: 0.7836 - val_loss: 0.2697 - val_categorical_accuracy: 0.8333 - lr: 9.9000e-0428Epoch 3/1029767/767 [==============================] - 4s 5ms/step - loss: 0.2294 - categorical_accuracy: 0.7829 - val_loss: 0.2775 - val_categorical_accuracy: 0.8333 - lr: 9.8010e-0430Epoch 4/1031767/767 [==============================] - 4s 5ms/step - loss: 0.2314 - categorical_accuracy: 0.7738 - val_loss: 0.2813 - val_categorical_accuracy: 0.8333 - lr: 9.7030e-0432Epoch 5/1033767/767 [==============================] - 7s 9ms/step - loss: 0.2278 - categorical_accuracy: 0.7816 - val_loss: 0.3063 - val_categorical_accuracy: 0.8385 - lr: 9.6060e-0434Epoch 6/1035767/767 [==============================] - 5s 6ms/step - loss: 0.2340 - categorical_accuracy: 0.7764 - val_loss: 0.3343 - val_categorical_accuracy: 0.8281 - lr: 9.5099e-0436Epoch 7/1037767/767 [==============================] - 4s 5ms/step - loss: 0.2244 - categorical_accuracy: 0.7875 - val_loss: 0.2807 - val_categorical_accuracy: 0.8542 - lr: 9.4148e-0438Epoch 8/1039767/767 [==============================] - 5s 6ms/step - loss: 0.2299 - categorical_accuracy: 0.7699 - val_loss: 0.2861 - val_categorical_accuracy: 0.8281 - lr: 9.3207e-0440Epoch 9/1041767/767 [==============================] - 4s 6ms/step - loss: 0.2286 - categorical_accuracy: 0.7855 - val_loss: 0.3185 - val_categorical_accuracy: 0.8281 - lr: 9.2274e-0442Epoch 10/1043767/767 [==============================] - 4s 5ms/step - loss: 0.2253 - categorical_accuracy: 0.7725 - val_loss: 0.2813 - val_categorical_accuracy: 0.8385 - lr: 9.1352e-04
0️⃣8️⃣ Evaluate the model performance 📈
After training the model, evaluate it on the dataset and print the loss and accuracy metrics.
1loss, acc = model.evaluate(test_data, batch_size=1)2print(f"Test loss:{loss}, Test accuracy:{acc}")
You should see an output similar to this 👇
1192/192 [==============================] - 3s 3ms/step - loss: 0.2387 - categorical_accuracy: 0.82812Test loss:0.2386528104543686, Test accuracy:0.828125
0️⃣9️⃣ Export to TensorFlow Lite Model 📦
After creating the model, convert and export it to a TF Lite format for later use on an on-device application. The export also includes model metadata, which includes the label file. Export the model to a directory by using the export method. The exported model can be loaded and used for inference in the future.
1model.export_model()
You should see an output similar to this:
1Using existing files at /tmp/model_maker/gesture_recognizer/gesture_embedder.tflite2Using existing files at /tmp/model_maker/gesture_recognizer/palm_detection_full.tflite3Using existing files at /tmp/model_maker/gesture_recognizer/hand_landmark_full.tflite4Using existing files at /tmp/model_maker/gesture_recognizer/canned_gesture_classifier.tflite
1️⃣0️⃣ Download the .task file 💾⬇
1!ls exported_model # List contents of exported_model directory2files.download('exported_model/gesture_recognizer.task')
In the provided tutorial, the final exported model file has been uploaded to the Cloudinary CDN and is accessible at this → 🔗here
Once it is downloaded, you can use it in your application. 🎉
👨🔬 For now, let’s try it out on MediaPipe Studio. Visit the Gesture Recognition tab and upload the model file. For best results, use the following settings:
- Inference Delegate: GPU Inference (for faster inference ⚡)
- Input Source: Camera (Integrated / USB Webcam)
- Model Selection: Choose a model file… → Upload (Upload the model file you downloaded)
- Demo num hands: 1
- Minimum hand detection confidence: 50% (Tweak this value to get better results)
- Minimum hand presence confidence: 50% (Tweak this value to get better results)
- Minimum landmark presence confidence: 50% (Tweak this value to get better results)
And Boom! You should see the results. 🎉
🛈 You can find all the code used in this tutorial on GitHub.
Moreover, you have the option to update the (default) CodePen example to utilize the model you recently trained. To accomplish this, visit the CodePen and make the following modifications in the JavaScript section 👇
1GestureRecognizer.createFromOptions(vision, {2 baseOptions: {3 modelAssetPath:4 // Should look like this when you update this line ↓5 "https://res.cloudinary.com/dutfy6mlc/raw/upload/v1687812204/gesture_recognizer.task",6 delegate: "GPU"7 },8 runningMode: runningMode9 });10 demosSection.classList.remove("invisible");11};12createGestureRecognizer();
The final CodePen example is available → 🔗 here.
⚠️ (Optional) Hyperparameter Tuning
You can further customize the model using the GestureRecognizerOptions class, which has two optional parameters for ModelOptions and HParams. Use the ModelOptions class to customize parameters related to the model itself, and the HParams class to customize other parameters related to training and saving the model.
Here, ModelOptions has one customizable parameter that affects accuracy:
dropout_rate: The fraction of the input units to drop. Used in dropout layer. Defaults to 0.05.layer_widths: A list of hidden layer widths for the gesture model. Each element in the list will create a new hidden layer with the specified width. The hidden layers are separated with BatchNorm, Dropout, and ReLU. Defaults to an empty list(no hidden layers).
Alongside, HParams has the following list of customizable parameters which affect model accuracy:
learning_rate: The learning rate to use for gradient descent training. Defaults to 0.001.batch_size: Batch size for training. Defaults to 2.epochs: Number of training iterations over the dataset. Defaults to 10.steps_per_epoch: An optional integer that indicates the number of training steps per epoch. If not set, the training pipeline calculates the default steps per epoch as the training dataset size devided by batch size.shuffle: True if the dataset is shuffled before training. Defaults to False.lr_decay: Learning rate decay to use for gradient descent training. Defaults to 0.99.gamma: Gamma parameter for focal loss. Defaults to 2.
Additional HParams parameter that does not affect model accuracy:
export_dir: The location of the model checkpoint files and exported model files.
For example, the following trains a new model with the dropout_rate of 0.2 and learning rate of 0.003.
1hparams = gesture_recognizer.HParams(learning_rate=0.003, export_dir="exported_model_2")2model_options = gesture_recognizer.ModelOptions(dropout_rate=0.2)3options = gesture_recognizer.GestureRecognizerOptions(model_options=model_options, hparams=hparams)4model_2 = gesture_recognizer.GestureRecognizer.create(5 train_data=train_data,6 validation_data=validation_data,7 options=options8)
Evaluate the newly trained model 🧪
1loss, accuracy = model_2.evaluate(test_data)2print(f"Test loss:{loss}, Test accuracy:{accuracy}")
🚩 OPTIONAL: Please note that you may encounter difficulties when renaming images during the process of updating and filtering images for the dataset. This situation can be particularly challenging if you are collecting image samples from Teachable Machine, as the assets (images) within the exported zip file are numbered (e.g., 0.jpg, 1.jpg, 2.jpg, etc.). There is a possibility of collisions with existing image names in the dataset. To address this issue, I have prepared a tiny Python script for renaming images in a specified folder according to a desired format.
1import os23folder_path = r'<FILE_PATH>'4file_extension = '.jpg'5start_number = 1 # Optional6# Get the list of files in the folder7file_list = os.listdir(folder_path)89# Rename files in the folder10for i, filename in enumerate(file_list):11 # Create the new filename with the desired format12 new_filename = str(i + start_number) + file_extension1314 # Construct the full paths for the old and new filenames15 old_filepath = os.path.join(folder_path, filename)16 new_filepath = os.path.join(folder_path, new_filename)1718 # Rename the file19 os.rename(old_filepath, new_filepath)2021print("File renaming complete.")
⚠️ You need to replace
<FILE_PATH>in the script with the actual path to the folder containing the files you want to rename. After modifying the script, you can run it using a Python interpreter or by executingpython script_name.pyin the command prompt or terminal.
References 📌
Here are the links to some of the best resources to learn more about MediaPipe:
MediaPipe GitHub repository → 🔗 link
Google AI Blogs → 🔗 link
Intro to MediaPipe by LearnOpenCV → 🔗 link
MediaPipe for dummies by AssemblyAI → 🔗 link
MediaPipe official research paper (Arxiv, 2020) → 🔗 link
Conclusion 🚀
That’s it for now! I hope you learned something valuable. I’m grateful to my mentor(s) for giving me this opportunity and I’ll try my best to make the most out of it. I’ll be posting frequent updates on my blog to keep everyone updated with my progress. I’m open to suggestions and feedback, so feel free to reach out to me on Twitter or LinkedIn. Stay tuned for more such blogs! 😄

